DIY Concrete Pumpkins

Don’t let the word concrete intimidate you my friends, this is such a fun DIY project!! Things you will need: concrete mix, pantyhose or tights, string/twine and random containers to pour into (apparently my preference of container is sour cream and coffee! Hahahaha!!) Head to your local hardware store and pick up a bag of Quikrete quick setting cement, you literally just add water! Mix it up to a fairly wet consistency so it doesn’t set too quickly on you. Stretch the pantyhose over the containers and scoop the concrete into the pantyhose then tie at the top.

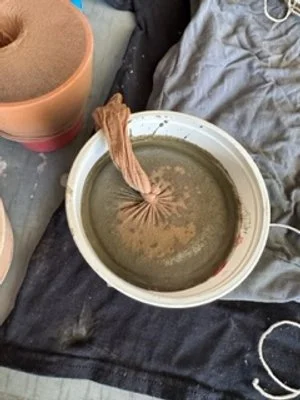
Before pulling the pantyhose out of the container, lay out your string, you’ll need 4 strings. I actually used crochet thread and it was the easiest to use and pull tight. Tie each string at the top to create the lines of the pumpkin, use your creative judgement on how tight you want the lines.


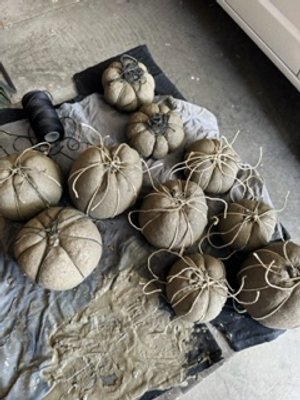
You will definitely want to lay down a tablecloth, or as pictured, a bunch of old garage rags (aka t-shirts). Once they are tied up, tis time to wait. Once they are set you can cut the strings and remove the pantyhose, you may have to cut the pantyhose a little. The concrete will be a little rocky or sandy, depending on your mix so dust them off as best you can, I like to use a paintbrush. You don’t have to seal them, but I like to contain any sand that might still be on them. I have sealed them using two different methods, spray acrylic sealer and brushing on Polycrylic protective finish, both methods work really well.

As far as stems go, use your creative freedom!! I have used springs, vintage keys, bolts, spindles, etc!! Just be creative and have fun with it!! I recommend E6000 glue to glue on the stems and good ol’ hot glue for gluing on the moss and greenery! and TA DA!!!! Have fun creating friends and as always, thanks for being here and I’m here if you need me!! Now go be awesome!!!
